



I love IFTTT, it’s a service that’s been delivering results and saving me a lot of time to this day. There are countless examples, from “spying” on the competition to receiving alerts and notifications. However, this automation service is primarily known for its use in managing tasks on social media, although it has many other possibilities, such as creating a custom Repost.
When I decided to set up the blog, I knew the importance of improving my WPO and performance, and one of the most effective ways to do this is to eliminate as many plugins as possible. Obviously, not all projects can do this to the same level, but for most cases, the example I’m going to share today will serve.
Contenidos
Recycle content on social media thanks to IFTTT
I think we agree that a brand account should be active, and sometimes there are occasions when we need to re-share a post through our social media channels. It’s also fair to say that there’s a lot more to posting content than just publishing it.
If you write on a blog or have experience with WordPress, you’ll be familiar with the plugin Revive Old Post. It’s very comprehensive and offers interesting options; but today we want not to rely on a plugin, so we’ll do the same but with a wider scope thanks to IFTTT.
Pros compared to Revive Old Post
- You don’t consume server resources.
- You have more options for personalizing the status, tweet, or whatever you like.
- You don’t need to pay for the PRO version of anything. It’s free.
- You have fewer limitations on posts compared to the lite version.
Cons compared to the plugin
- The date range is much more limited.
In general, you can do almost the same thing with almost the same options, but with the advantages mentioned earlier.
How to create your own Repost for social media
From now on, I’ll use the term “reposter” to refer to this procedure. The idea is to rescue our posts periodically. To do this, we need the following:
Now the first step is to determine what we want to automatically rescue, you can use feed filters, limit by categories or do it for the entire blog. It depends on what you want to rescue in your social media channels. For example, if you have a personal blog and you want the reposter to rescue only posts from a specific category, you’ll need to extract the RSS of that category.
Starting with our auto repost
We need to configure both accounts; first I recommend doing it in Buffer and within this, select the social media channels where we want to show our content. Once this step is done, we’ll choose the time slots when we want our content queue to start. To do this, go to Settings > Posting Schedule and select the time slots.
I’ll do the example with my real account. My idea is to launch all the posts that have already been launched on the blog on Saturdays at 20:30. The repetition will be done only once, as you can see in the image.
*Note: You’ll need to configure the time slots for each social media channel separately.
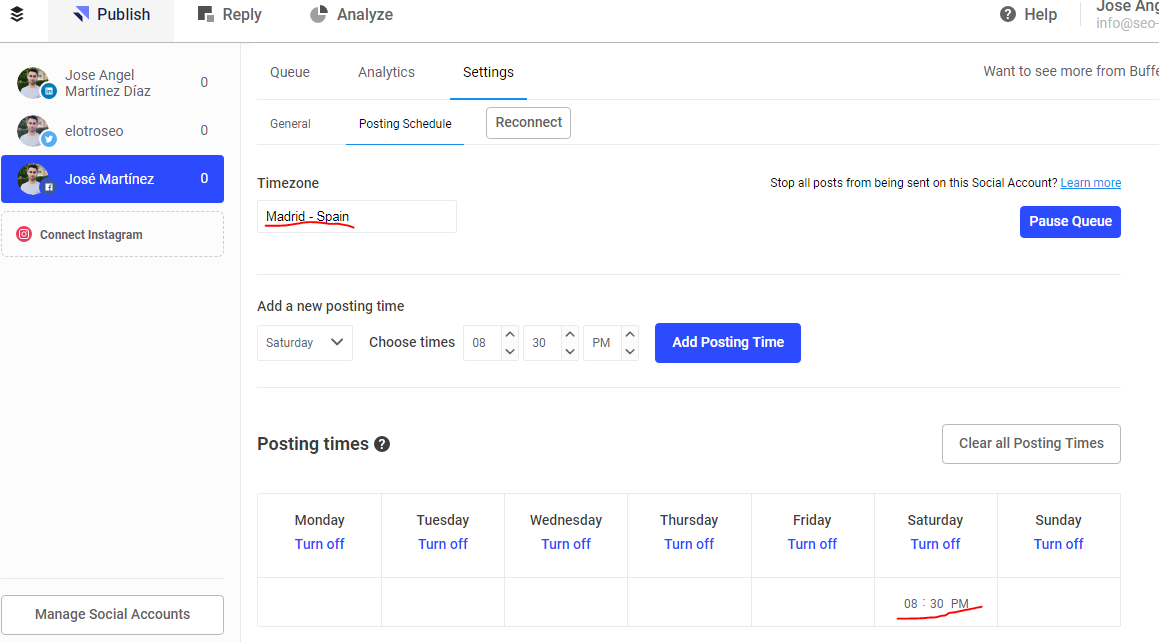
What we’re going to do is have IFTTT send content to the programming queue that you just created every time something new is published on the entire blog. Now I’m going to send two old posts manually to the queue through Buffer, “and why are you doing this?” you’ll ask, well, today is Friday and if I launch this entry now, it will be launched again tomorrow Saturday, so to compensate I’m giving a cadence of two additional Saturdays between contents. Do you get it?
Configuring the alternative to Revive Old Post in IFTTT
Now it’s time to do the same in IFTTT, and to do this, we need to create a rule that uses the RSS trigger called “New Feed Item”. To start, we press “New Applet” and search for it by selecting the option “THIS” and then the orange tile. Okay, you’ve found the RSS trigger, now we’ll be asked to enter our feed, and if you use WordPress, you usually extract it by adding “/feed” to the end of the URL of the blog or category.
We need to choose the action that will follow when the trigger starts, in this case, we press “THAT” and search for the Buffer service. We’ll need to connect our account. Once done, we’ll select the social media profile and that’s it. You’ll see two actions, the first one is the one we need “Add to Buffer”.
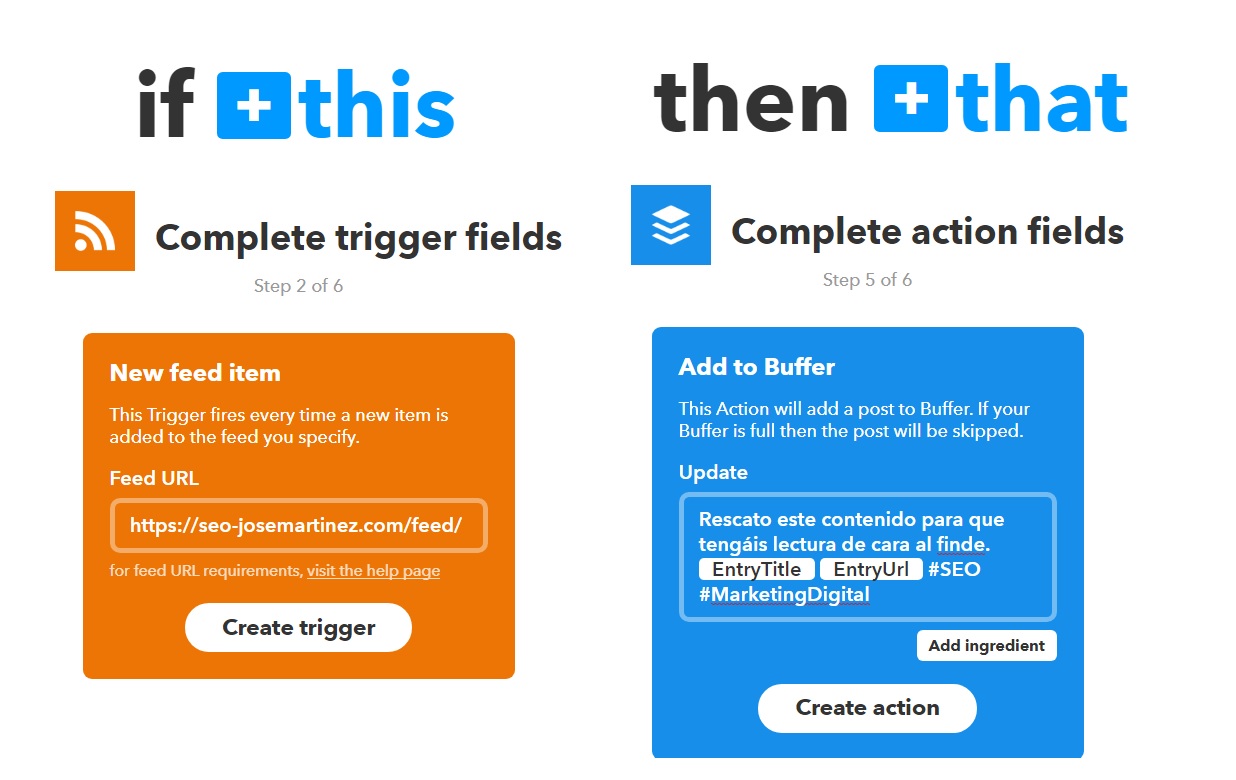
As you can see, in the Buffer box I’ve personalized the message a bit, it will be a way to re-share content on weekends in a way that my audience will easily recognize.
And that’s it, that’s the “science” behind this simple but powerful automation. Now imagine the possibilities; you can create several Applets with several accounts that move content to different times, segmented by categories or even adding sources from other media. The limit is up to you.
If you want to learn more about these services or read my post about IFTTT in Spanish, don’t forget to follow the blog. You can also find me on social media. Your comments are always welcome ?