



Managing one or several websites can be a titanic task. And I affirm this categorically. Over the years, I have specialized in SEO for media, more out of necessity than anything else. Currently, I manage some news websites that demand a lot of attention.
But luckily, tools like Google Analytics make my life easier and more productive. If there’s one thing I’m sure we don’t have enough of, it’s time, and having the peace of mind that some alerts will notify us is a delight. If you liked my previous post on monitoring internal searches on your website, stay tuned for this one.
Contenidos
What are Google Analytics alerts?
Although it may seem simple, many people don’t know what they are or the potential they have. As I said, they have a lot of practical uses that you should know, and as I’m a bit stubborn about this, I’ll continue to expand on this post in the future.
Basically, it’s about configuring email notifications when a certain action occurs. These alerts work based on conditions, such as if a value is greater than X, is between A or B, or if its percentage is less than X. There are several combinations and a lot of possibilities that will help you better understand your website or online business.
Know your audience to improve, and let Analytics work for you.
Previous considerations of Google Analytics alerts
- They only work by email. There are no push notifications in the mobile app.
- They are not in real-time, a summary is sent based on the period. Minimum 24 hours.
Configuring alerts in Google Analytics
Once you’ve understood this, it’s time to get started and configure some simple but vital alerts. As I said, I’m more focused on SEO for media, so these alerts are very focused on the types of problems that usually arise in news websites or those with a high freshness factor. Shall we get started?
- Open Analytics.
- Go to the “Admin” section.
- Scroll down to the “View” area.
- Once you’re in View, scroll down to find custom alerts.
- Click on “New alert”.
Here you’ll see some fields that serve to configure all notifications to your liking. This part is the ‘alma mater‘ of alerts, and it’s where you’ll define what you want to measure and notify.
Basic fields of alerts
- Alert name: I advise you to use a striking one to identify it quickly.
- Apply to: This is in case you have multiple views. We’ll see this in the future, leave it by default.
- Period: When you want to be notified, daily, weekly, or monthly.
- Email: This is so the alert sends an email to you or several people.
Conditions of alerts
- Corresponds to: Here you specify the measurable segment. This is the most important part of everything. For example, if you want an alert to notify you if traffic drops, you should choose “All traffic”, but if you want to segment a specific section, you need to choose from the different sections. Imagine you’ve run a Facebook Ads campaign and want to be notified when you exceed X new users, you’d have to choose Acquisition > Source, and select Facebook.
- Alert me when: This area is where you define the secondary value required. Following the Facebook example from a few lines ago, we choose “Users” because what you want to attract is new users, not visits.
- Conditions: Both in the “Corresponds to” and “Alert me” fields, we have condition drop-down menus that serve to condition what we’re looking for. Let’s go with a basic example for the Facebook event.
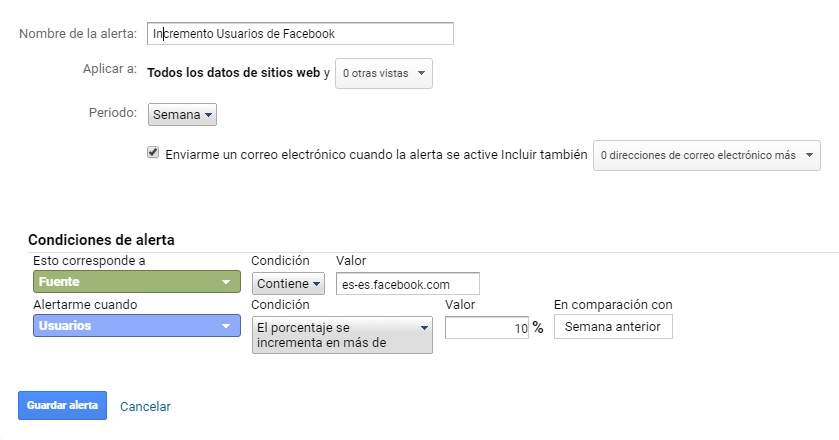
As you can see, basically what I’ve told the tool is to notify me weekly by email if users from Facebook increase by more than 10% compared to the previous week. That way, I’ll know if my campaign is working while I focus on other things.
Rule 1 – Control your website traffic
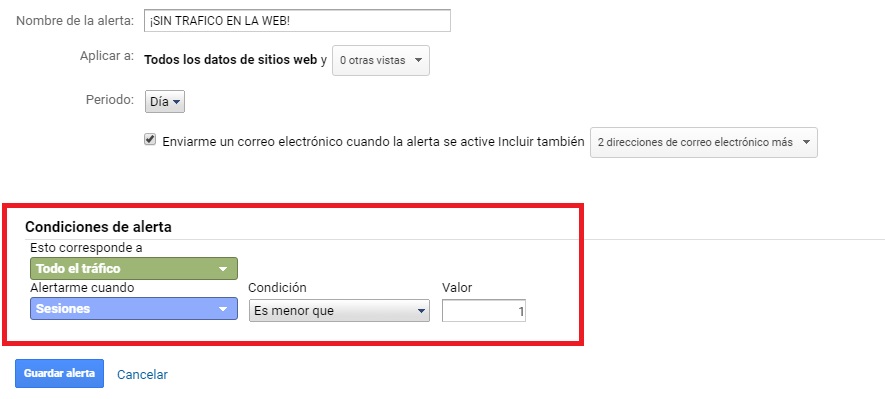
Let’s move on to the first alert. If your site has constant traffic, you’ll likely want to know when traffic falls below expectations, even to zero. Why is this rule useful? Simply because it allows you to detect the following problems:
- If your website is not being crawled by Analytics.
- If your server has crashed, or your website has problems.
This rule is simple to configure; I leave you a screenshot to make it more graphic. As you’ll notice, I want to be notified when traffic drops to zero daily, it’s a very aggressive value for one of my websites that receives thousands of visits per day, so if it falls below that threshold, it’s because something serious has happened. However, you can be more moderate with the values.
Rule 2 – Control your accelerated pages
AMP is the future! Google has stated this on more than one occasion. And as it’s logical, we all rush towards this technology. Basically, it’s a design standard with great limitations so that websites load instantly. The advantages are many, especially in the positioning of media, as Google positively values the AMP format and usually rewards it in rankings.
But if, like me, you’ve faced the implementation of AMP in a project already started and with hundreds of thousands of URLs, you’ll know the headache it entails. Additionally, this technology is changing rapidly, and it’s not uncommon to see that what worked yesterday is now limited by a new directive. This is even more severe if several people manage your project.
At some point, someone decides to launch an entry in the company blog with an inserted video from Vimeo. But AMP until recently didn’t support these videos and considered them as a non-admitted iframe. I mean, you could only use YouTube. This generates AMP errors, and if they accumulate, your traffic suffers. So, let’s make Google Analytics alerts help us out. As before, I show it graphically.
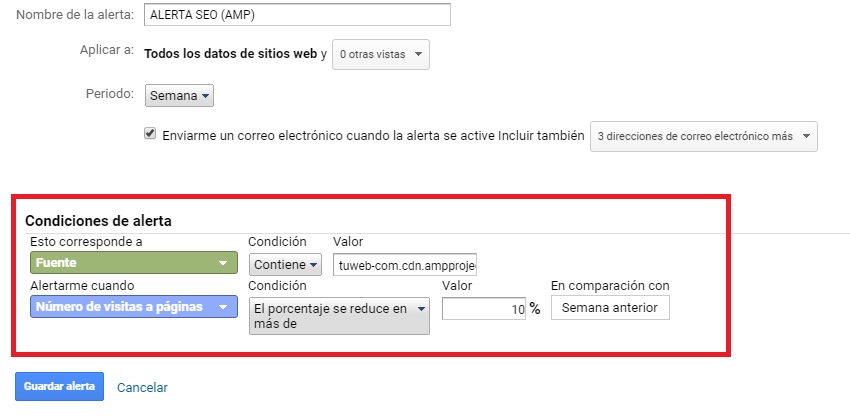
It’s essential to mark “cdn.ampproject.org” in the field called “contains,” as this way you measure everything that comes from Google. In my case, I don’t want to monitor all AMP traffic, only the one that comes from Google, as Twitter, for example, applies the AMP version by default if you have it installed. If you want to monitor all AMP traffic, you can modify the configuration to this:
- Corresponds to: Behavior > Page
- Contains: /amp/
I don’t find much sense in monitoring all AMP traffic by alerts, as it doesn’t offer a real vision, but there will always be someone who wants to do it.
Bonus: If you’re discovering Google Discover, you can use the same configuration by changing “cdn.ampproject.org” to “discover.google.com” and “googleapis.com”.
Rule 3 – Take care of mobile traffic
The big G is determined that sites work on the mobile version above all else. So much so that in recent weeks, most responsive sites have been notified through Search Console that Googlebot for Smartphones will crawl their sites. You’ll understand the importance of having an adequate mobile experience.
It’s normal that we make changes to the website, and it’s also usual that the base version is the Desktop one (a big mistake, by the way) instead of the mobile phone one. A good way to see if those changes are affecting the time users spend on the mobile version of your site is to have control over it. To do this, you can use this simple rule.
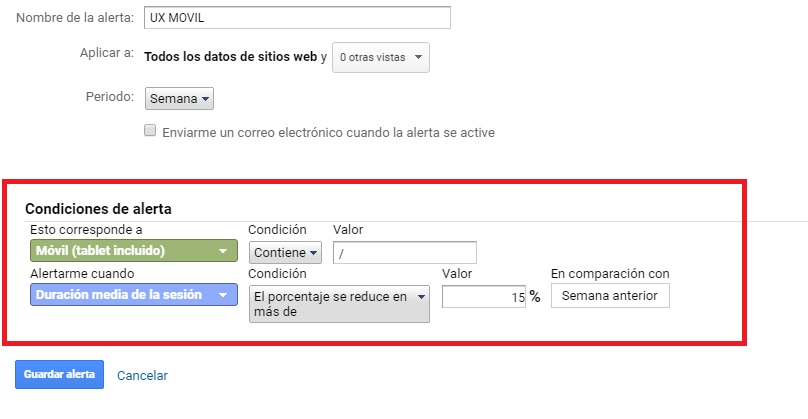
Once again, the values I use don’t have to be the same as yours. I imagine that since you’ve become familiar with Google Analytics alerts, you’ll understand the syntax. Basically, what we’re telling the tool is to notify us if the average time of a visit/session on our mobile site drops by 15%.
This is useful for detecting if those changes are causing users to leave earlier than expected. It’s especially interesting not only because Google may or may not knock you down in the SERP, but also because if you work with AdSense, the average time of your users is key to your income.
Will we see you in the next post? Don’t forget to share this entry to help other people.